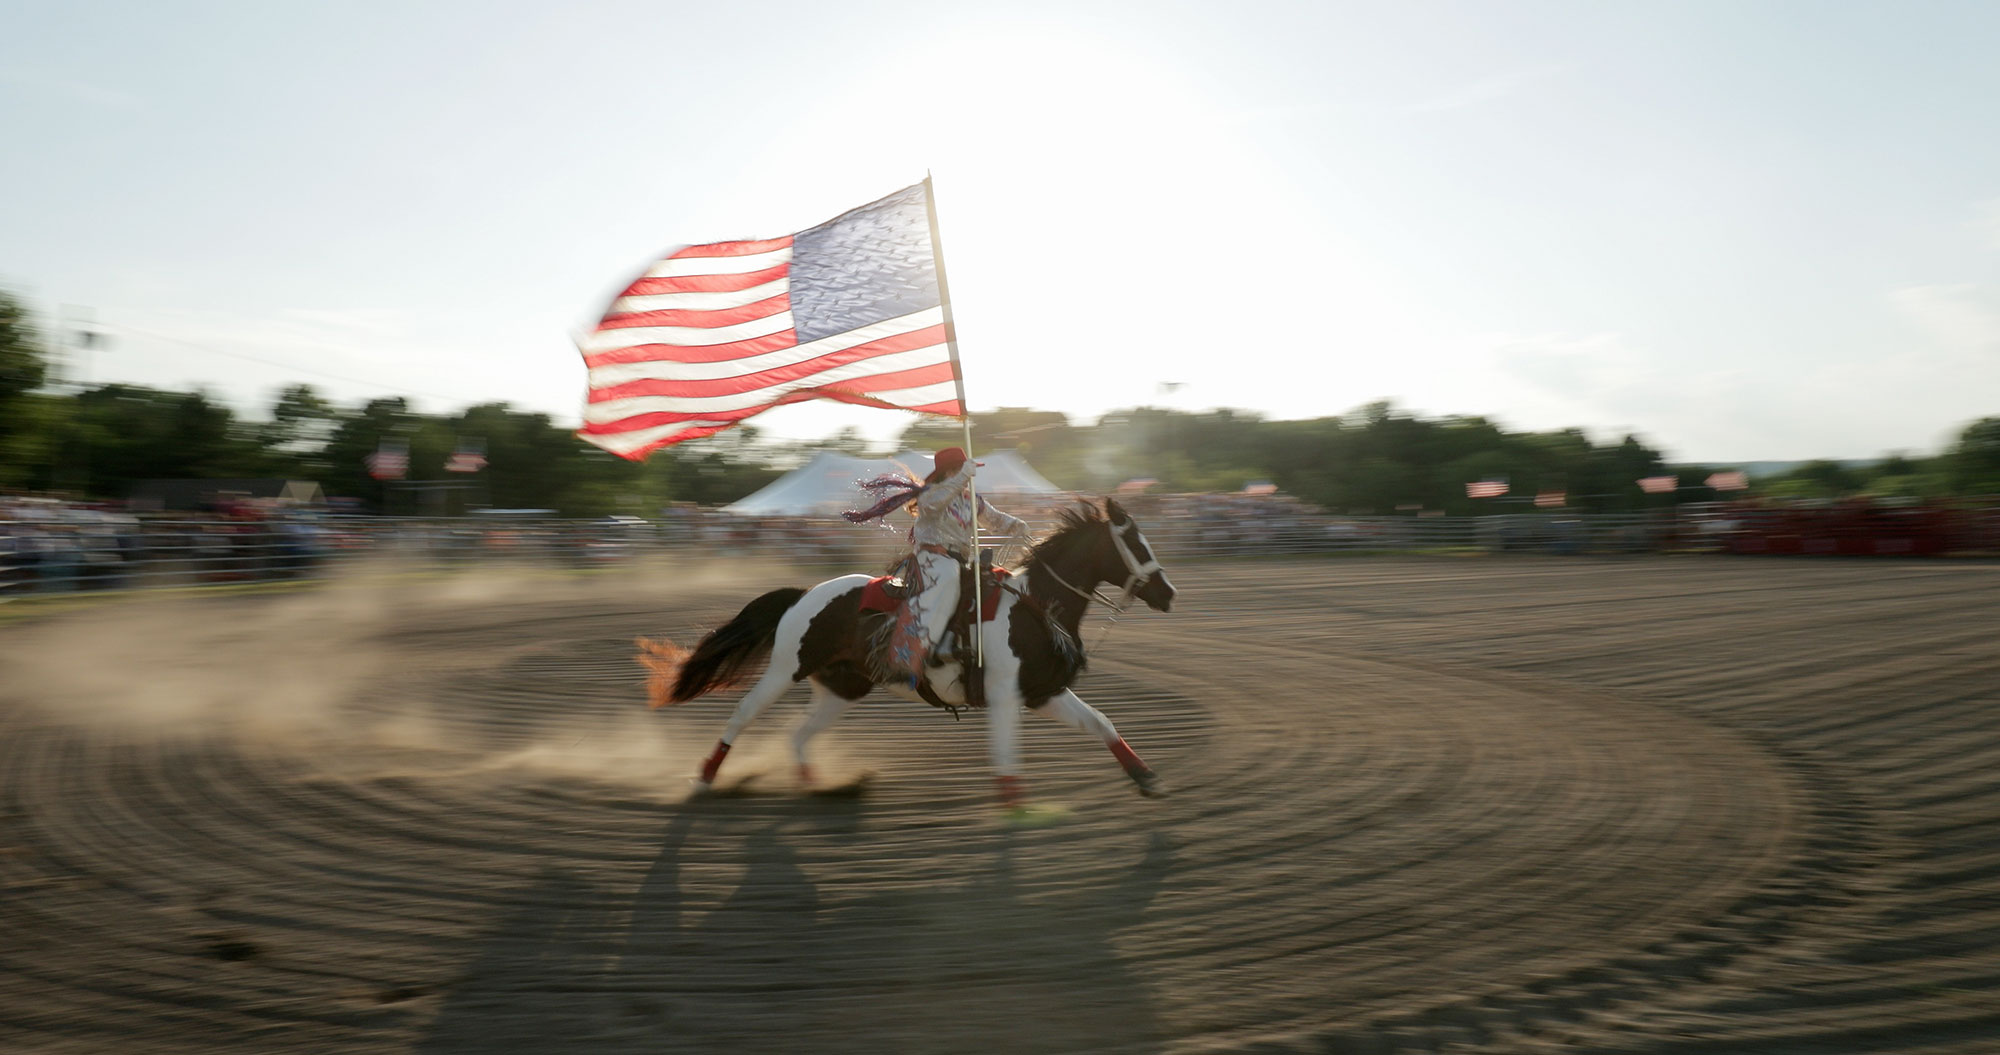
You might not think of it as the place for a rodeo but New Jersey can surprise you. Despite being the most densely populated state in the union New Jersey has a fair amount of open space and farms. The Montgomery Rodeo, based in Skillman, NJ, is in its 23rd year. I paid it a visit, my third in about a dozen years, to see the action and to test out the 4K video capabilities of the Canon 1DX Mark II. An evening competition along with perfect June weather set the stage.
You can view Rodeo Sunset on Vimeo at resolutions up to 4K.
Music: “Make Me Howl” by Trevor Menear.
For this review I’m going to assume you have some familiarity with the 1DX Mark II, the 1DX, and Canon’s Cinema line. In brief, versus the previous generation 1DX, the 1DX Mark II brings better auto focus for both stills and video, vastly improved video recording if you shoot in 4K, and the option of higher video frame rates (60p in 4K and 120 fps in 1080 HD). In video quality terms the 1DX Mark II is in practically the same as Canon’s more expensive Cinema EOS 1D C, but with C-log gamma settings missing.
The industry standard video features omitted from the 1D C are still absent in the 1DX Mark II. There is no peaking, waveforms, zebras, XLR inputs, EVF, and no tilting screen.
Rodeo Sunset details:
- Dual-pixel AF used for every clip.
- Sunny WB preset until the arena lights came on, then Auto WB was used.
- Ambient sound via a hot shoe mounted Sennheiser MKE 400 direct into the camera with levels set manually.
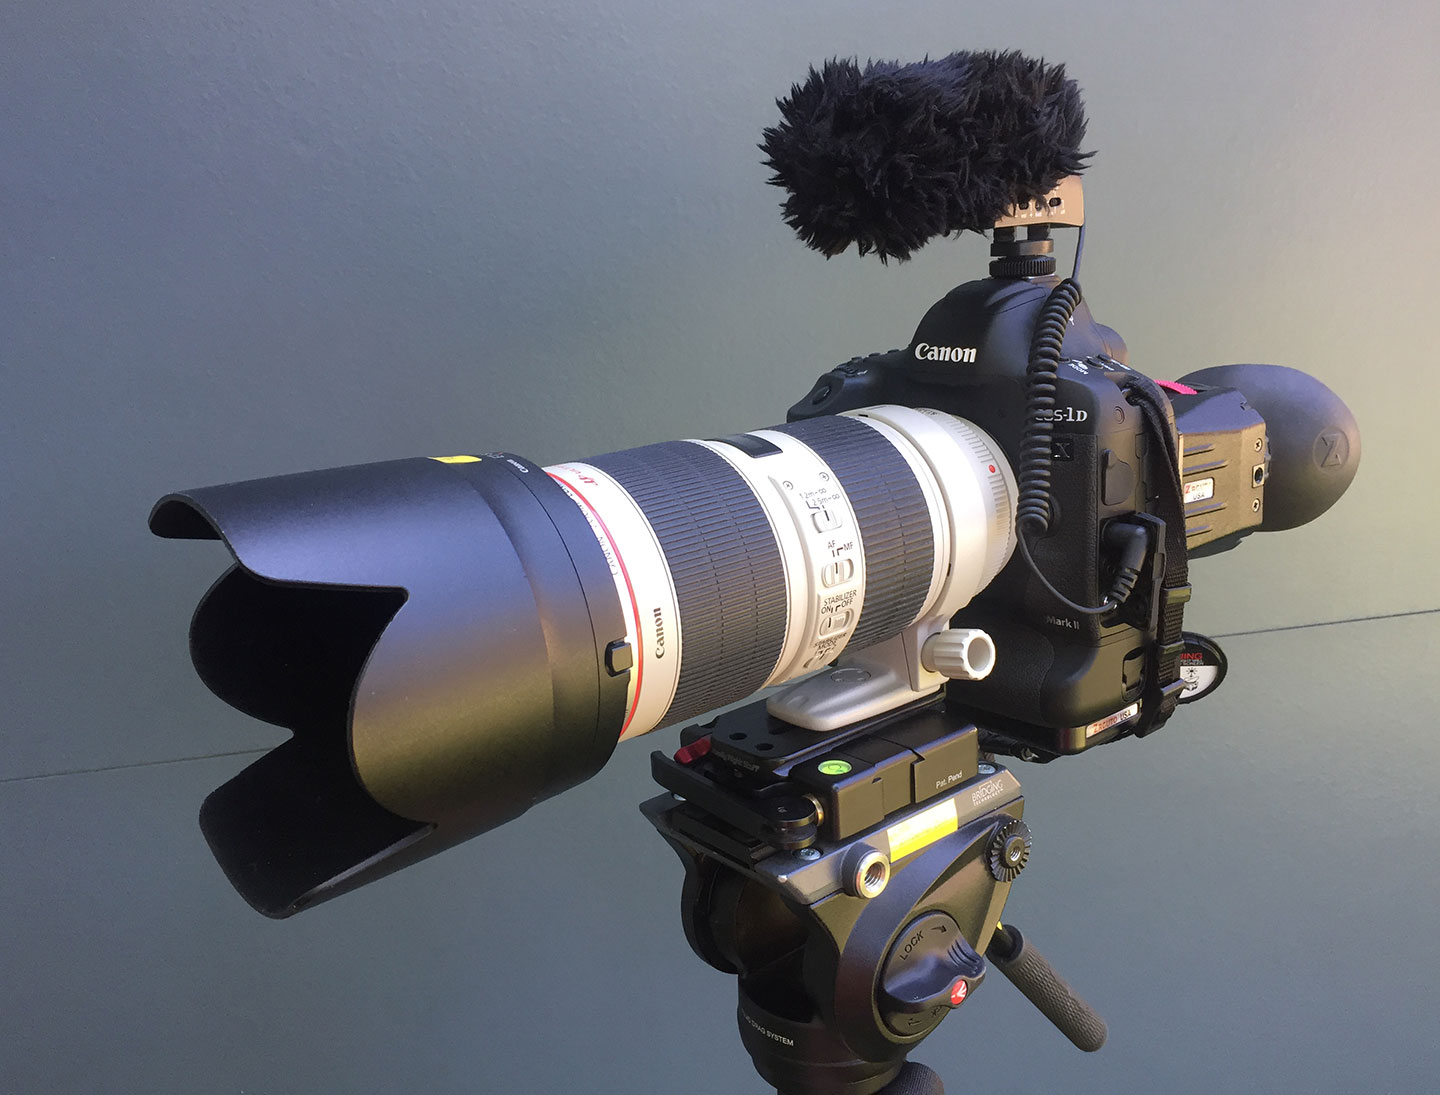
- Lenses: Canon 16-35 f/4L IS, Canon 70-200 f/2.8L IS II, and Canon 100-400 f/4.5-5.6L IS II. A 0.9 ND was used until the light levels were low enough that it was not needed.
- Lenses were shot wide open for most part.
- All footage was handheld or on a monopod.
- Modified Prolost Flat profile used (Neutral; 0, -2, -1, 0 for sharpness, contrast, saturation, and color tone.)
- The first two clips were shot at 24p (23.98). All other clips at 60p (59.94).
- 180 degree shutter: 1/50 for 24p and 1/125 for 60p.
- ISOs ranged from 100 – 12800.
- Footage was placed into a 30p (29.97) timeline in FCP X to enable slow motion when wanted.
- Some grading in FCP X but only to control contrast and tonal range. No color adjustments were made.
I came away from this experience wildly impressed. The 1DX Mark II’s footage is gorgeous and incredibly detailed. It can be pushed in post far more aggressively than the C300’s internal 50 Mbit/s footage. The trade-off for this is that the 1DX Mark II shoots at extremely high data rates; 500 Mbit/s for 4K 24/25/30p and 800 Mbit/s for 4K 60p (the high data rate has a lot to do with the inefficient MJPEG encoding used). The latter translates to ~16 minutes on a 128 GB Cfast 2.0 card. This is the only way to shoot 4K 60p on the 1DX Mark II; other frame rates can use a CompactFlash card.
In terms of frame rates, Rodeo Sunset, is a bit of a compromise. I knew I wanted to shoot at 4K 60p and do slow-mo via a 30p timeline but I shot the first two clips at 24p as I rushed to get the action. So, you are not seeing the majority of the footage at its native frame rate. The 24p clips have had frames added to them by FCP X to run in the 30p timeline. FCP X has also dropped frames in the 60p footage to run it in the 30p timeline. For both, the motion in Rodeo Sunset is not quite as smooth as it is in reality. Only the slow-mo footage is frame-for-frame accurate. Given that, a couple of sample clips are provided below which run at their native frame rates. They give a more accurate sense of the motion.
24p Clip in 24p Timeline:
60p clip in a 60p Timeline:
It was definitely a bit painful to use a DSLR after having used cinema-style cameras for a few years. I started shooting video in 2010 with a Canon 1D Mark IV and then for a brief spell with 5D Mark IIIs. I have owned a C300 for four years and I have used C100s, C100 Mark IIs, and C300 Mark IIs on projects. To step back into the DSLR based video world of ND filters, hodgepodged screen loupes, and incomplete feature sets was a challenge.
For this project I brought my trusty Zacuto Z-finder out of mothballs and attached it to the 1DX Mark II via its adapter and base plate. It works, but using it was a reminder of the compromises inherent to DSLR based video shooting. It’s all a work-around to make a stills camera act like a real video camera and it never quite gets there. Parts loosen or get in the way and nothing is 100% solid.
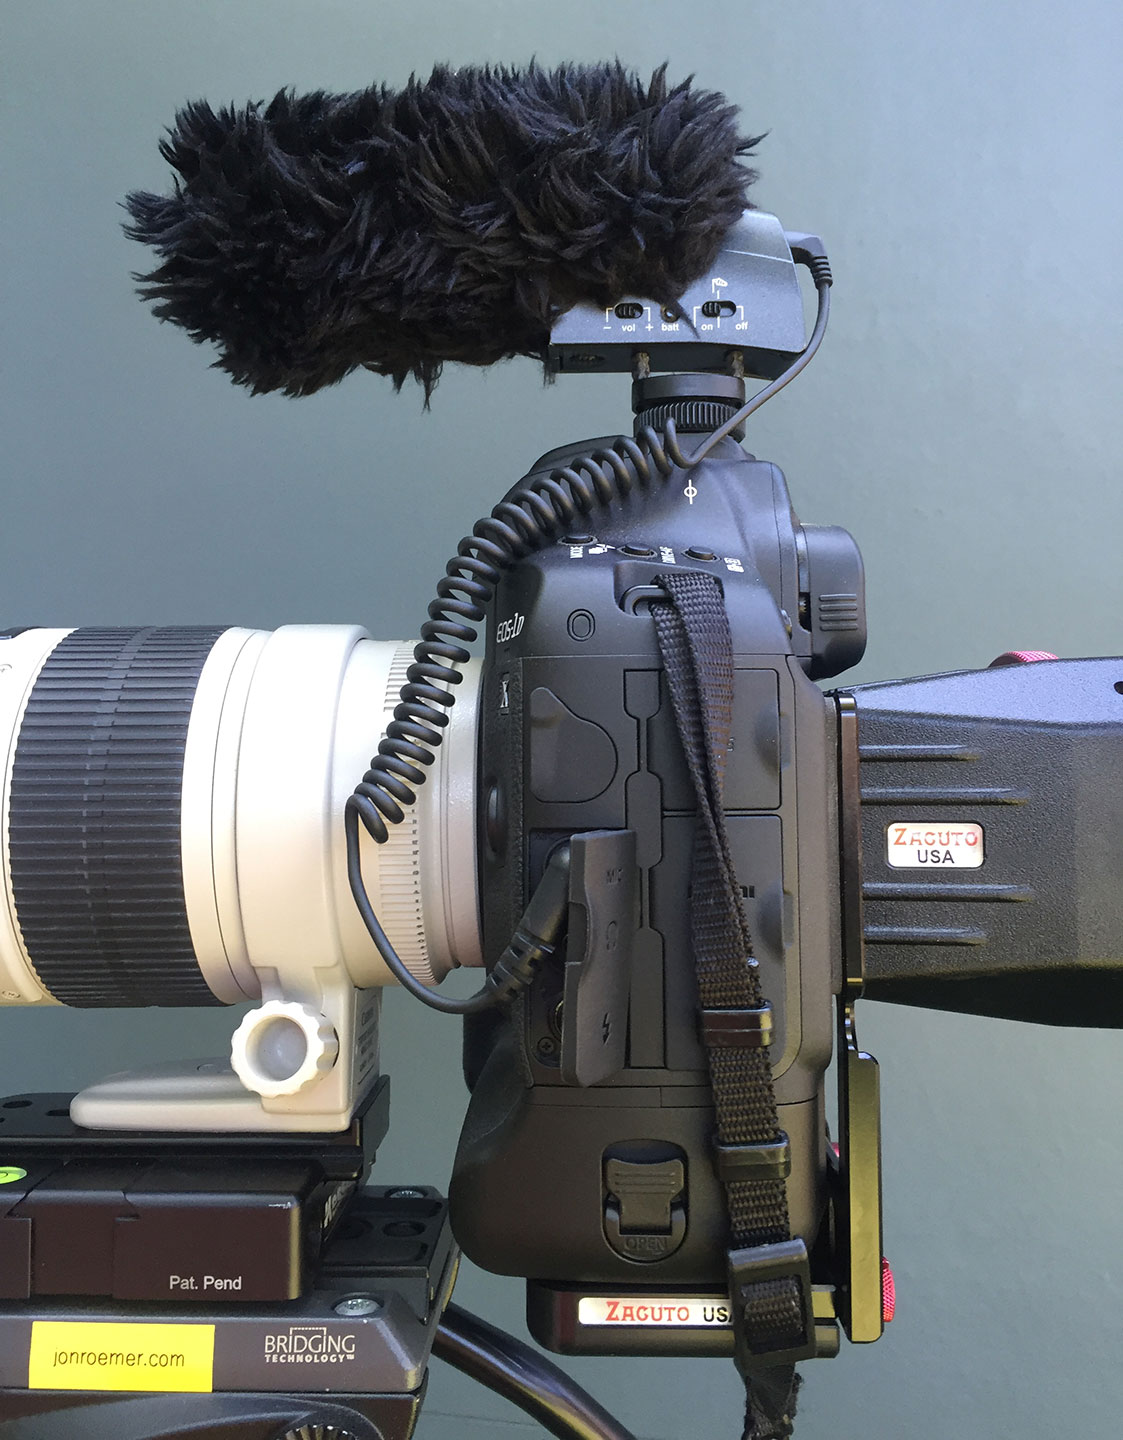
It should be noted that using any loupe on the 1DX Mark II means you lose access to the camera’s touch screen. It’s an inconvenience but not necessarily a deal breaker. You can still set the camera’s AF focus point via one of the camera’s multi-controllers.
In general, I find I can manage without waveforms, zebras, or peaking. Coming at this as a long-time stills shooter, I know how to work with the histogram and highlight clipping warnings. Peaking is rarely good on DSLR-sized screens anyway. A tilting screen would be very helpful but I get how not having it makes the 1D series all the more indestructible (I have used them in steady downpours). All of these, the monitoring tools and the tilting screen, can be added via an external monitor or a third-party EVF. Of course this, like the loupe is yet another add-on, with more potential points of failure, and it makes the camera bigger.
As you can guess, I am not planning on giving up my C300 anytime soon. Its all-in-one package is too convenient, its professional audio and video ins and outs are much more reliable, and its image quality is still great. For interviews as well as other projects it is the way to go.
The 1DX Mark II is a different beast. When shooting video it has the faults of any DSLR, but the upside is its 4K footage and its dual-pixel autofocus. When I view the 1DX Mark II 4K clips I feel like I did when I moved from shooting video with my DSLRs to the C300. I’m in awe. The difference is that noticeable and it not only applies to the “look”, it applies to what one can do in post.
I mentioned up top how aggressively one can manipulate the 1DX Mark II 4K footage. Here are two clips, one used in Rodeo Sunset at 01:50, where I masked out the sky and brought up the shadow detail significantly. Both were exposed for the sky, as while shooting these I was envisioning using them as silhouettes. The clip of the cowboy going over the railing, as shot, is even a bit too underexposed for that. No harm, no foul. I brought up the shadow detail primarily through raising the shadows’ highlights and the detail is all still there. The increase is noise is minimal.
The 1DX Mark II is 8-bit 4:2:2 as are the C300 Mark I internally and the C100 Mark I and C100 Mark II when going to an external recorder. I have shot them all in C-log and Wide DR. You cannot do that kind of shadow recovery with any of them.
I did not notice any banding in the 1DX Mark II footage, something the 1DC shooting in C-log is prone to, but there is some noise visible in the Rodeo Sunset footage shot at higher ISOs. For what it is it feels organic and it is more visible in a frame grab than in the footage. The barrel racing in Rodeo Sunset at 01:57 was shot at ISO 2000, the team roping at 02:30 at ISO 12800, and the bull riding at the end at ISO 5000.
I could not have shot Rodeo Sunset with my C300. Its first generation dual-pixel AF would not have been up to the task. Trying to pull focus manually wasn’t an option either. I’m sure a C300 Mark II could do it -it has a similar dual-pixel AF to the 1DX Mark II (except for the touchscreen) – but I’m also sure I would have needed to use a tripod and that creates a bigger footprint. The tripod, along with the C300 Mark II being a bigger camera, would draw attention to itself. This wouldn’t be an issue on a commercial project, but out in the real world it would have changed the dynamic and possibly meant needing permission and maybe even a filming permit.
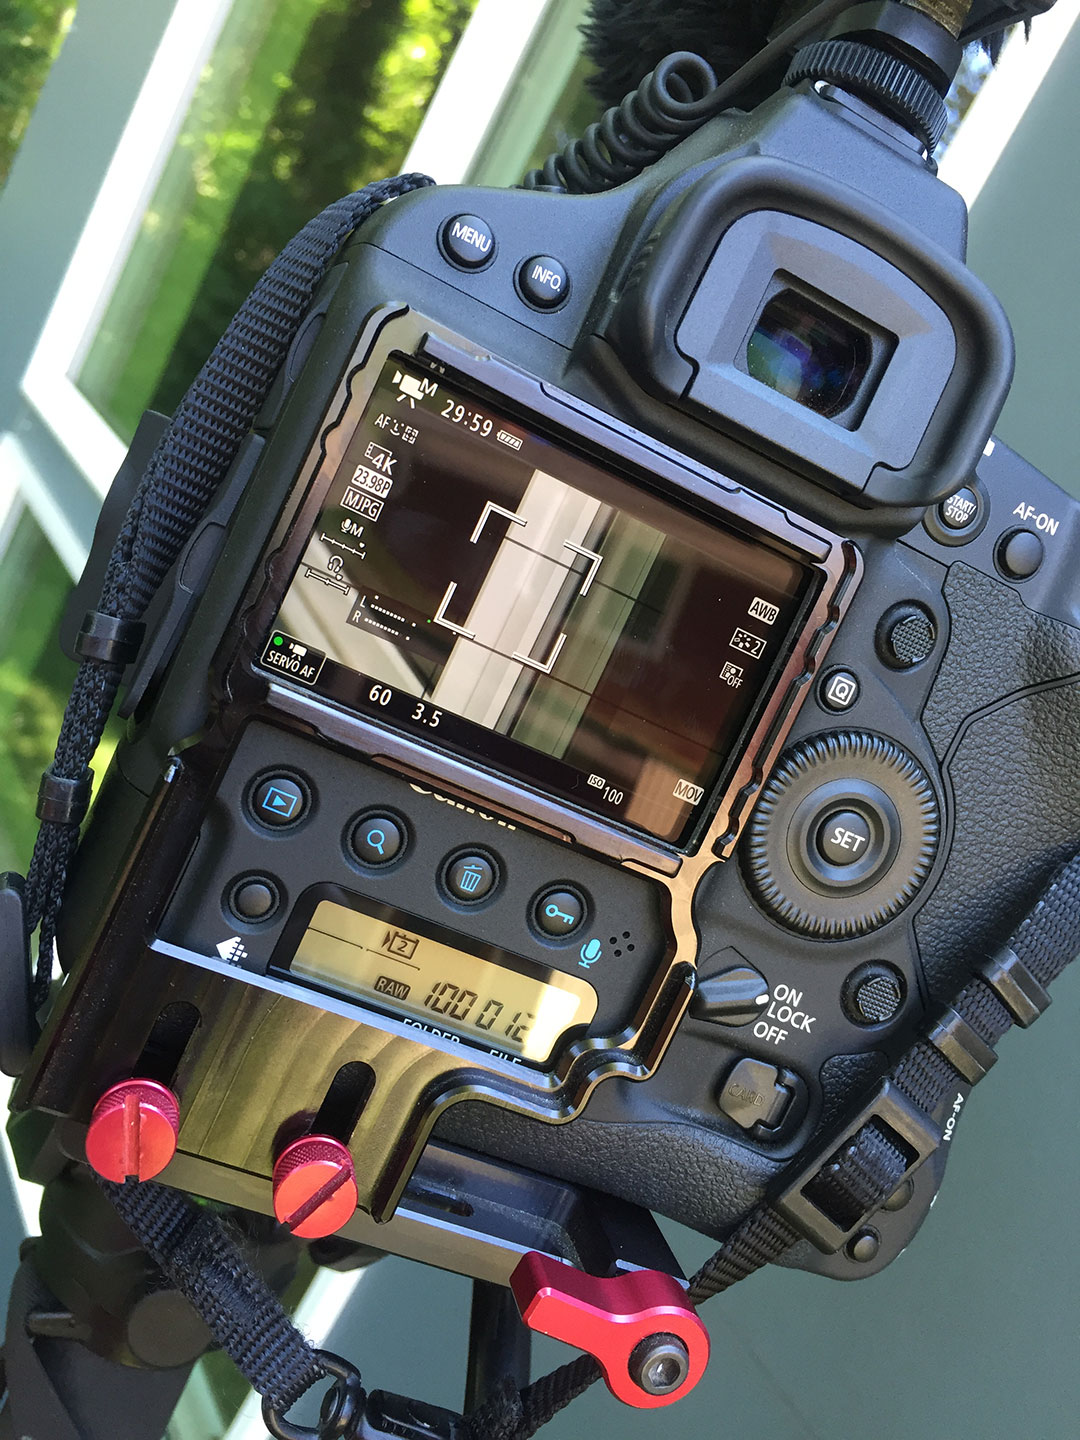
Video mode on the 1DX Mark II is activated via a toggle switch to the right of the camera’s viewfinder. The same place as the Live View button on the 1DX, but with that camera you had to go into a menu to choose Live View for stills or Movie Mode. The 1DX Mark II frees you of the menu – it’s on the toggle to choose either.
The 1DX Mark II has a Quick Control “Q” button to the right of its screen. In movie mode this conveniently and quickly gives access to almost all of the needed controls: Auto Focus, Frame rate/Image Size/Compression, Audio Input Control, Headphone Volume, White Balance, Picture Style, and Auto Lighting Optimization.
The dual-pixel AF on the 1DX Mark II performed really really well on this project. The camera has two AF methods in video mode: Face + Tracking and FlexiZone – Single. The former will track people or objects as they move within the frame, the latter focuses at specific points (ideal for doing focus pulls).
The camera’s Face + Tracking mode does not offer any further control over how it operates. You tell it where to start and what to follow via the touch screen or the Multi-controller and you let it run. FlexiZone – Single has two parameters to finesse how the 1DX Mark II applies focus: Movie Servo AF Speed which controls the focus transition speed and Movie Servo AF Tracking which controls the camera’s sensitivity to objects which cross in front of what you focused on. It’s important to note that FlexiZone – Single’s parameters are in the menu but are only accessible when movie mode is activated and a lens is on the camera. They can be saved to a Custom Menu for quicker access.
For Rodeo Sunset the Face + Tracking mode made the most sense. I needed the camera to follow objects. Literal face tracking did not come into play because each clip started with a rider relatively small in the frame, behind a gate, and often wearing a helmut with a face mask or a cowboy hat pulled down over their face. So, I started each take selecting where the subjects were and let the camera do its AF work while I concentrated on the action. Earlier in the shoot, when there was still lots of daylight and I had the Z-finder on the camera, I did some focus selection via the Multi-controller as I had no easy access to the touch screen. When night fell and I no longer needed the Z-finder I controlled the camera directly on the touch screen.
The touch screen was a pleasure to use. It’s so simple and easy. It was particularly useful when I was shooting the candid clips seen in the middle of the film.
The 1DX Mark II’s AF system didn’t hold focus 100% of the time – you can see that in the footage – but considering the setting; large animals moving quickly and erratically; dust clouds obscuring objects and detail; strong backlight; that I wasn’t using a fluid head to smooth my following of the action; and that I was shooting wide open,; it was nothing short of remarkable.