Digital photography can be like going down the rabbit hole. You don’t know where it’s going to lead and sometimes you end up making changes that can affect things wildly. Canon’s more recent cameras have a new tool built-in called microadjustment. It allows you to fine tune the focus on a camera-wide basis or specific to each lens.
I had toyed with it a bit last year when testing the Canon 16-35 zoom lens vs. the new II version. I found it helped the updated II lens quite a bit. A few weeks ago, I got my cameras back from Canon after some updates (in early March Canon announced an auto-focus update & Error 99 fix for Mark III 1D & 1Ds cameras.) In testing them I found focus issues with my 70-200 lens. It was missing focus significantly but, not knowing if the lens or the newly updated Canon bodies (1Ds Mark III’s) were the issue, what would have been a simple test led to my testing every lens I own twice so that my two bodies could be compared as well.
Fortunately, Chuck Westfall of Canon has published guidelines on using the microadjustment tool. They can be found in his Digital Journalist column. Scroll down to the second entry, What is the best way to use the Micro Focus Adjustment on the Mark III?
The process can be time consuming. You need to set your camera up on a tripod, be at least 50x the focal length of the lens away from the focus point, turn off IS if your lens has that feature, with zoom lenses set them to the longest focal length, set the lens wide open, use one-shot AF, and then begin testing. The process involves narrowing down what will be the best adjustment, first with wider corrections (e.g. +5, +10, +15, -5, -10, -15) and then with more fine tuned corrections. For each data point you’ll want to take three images and for each image you’ll want to rack the focus out to infinity prior to taking the shot. The latter will make the camera focus on the mark each time and the former will cover you if there is any variance.
You’ll need to view the images at 100% on your monitor to compare – first in choosing the best of three images for each setting and then in comparing settings.
When I first tried the test I used my X-rite/MacBeth Color Checker as the focus point but quickly realized it would not work. It’s not inherently sharp enough. Searching online I came across a standard resolution chart. I printed it at 2880 dpi on high end glossy paper and it became my focus point for these tests. In Chuck’s article he recommends using a flat surface, parallel to the camera, so this type of setup should be optimal. I mounted the printed chart on a cork bulletin board to keep it flat. Also, keep in mind that you are using the resolution chart only to check focus, don’t be concerned with how many of those miniscule hash marks are being resolved.
I found the best way to test is indoors as long as you have enough space. A 14mm lens needs 2.3′ where a 70-200mm lens @ 200mm needs 33′. Indoors, you can light the chart and use manual exposure control for consistency.
A few more helpful hints:
- In Canon’s DPP software you can use command-I in the browser mode to get the image’s metadata readings. This will show you the microadjustment setting for that particular image.
- Since Canon’s DPP will not show you more than one image at 100% you can process images out and compare in another program or keep them in raw format and use a program like Aperture. I ran DPP on one screen in order to confirm the microadjustment setting and then Aperture on my primary screen so that I could compare images at 100% and also easily rename the files according to the setting and the lens used.
- You could use live view or shoot tethered for this but I found it easier and simpler to create the rougher adjustments first, saved to a compact flash card, download and evaluate those, and then lather, rinse, and repeat by narrowing down to the finer settings.
- On the Canon 1Ds Mark III the microadjustment control is in Custom Function III, Setting #7.
- Within the setting above, you’ll want to use, #2:Adjust by Lens.
Is it worth all this work? Does it make a difference? Unequivocally, yes! My images are sharper out of the camera, across the board, after having done this. It also pointed out issues with two of my lenses, my 70-200 and my 24-70, prompting me to take them in for repair.
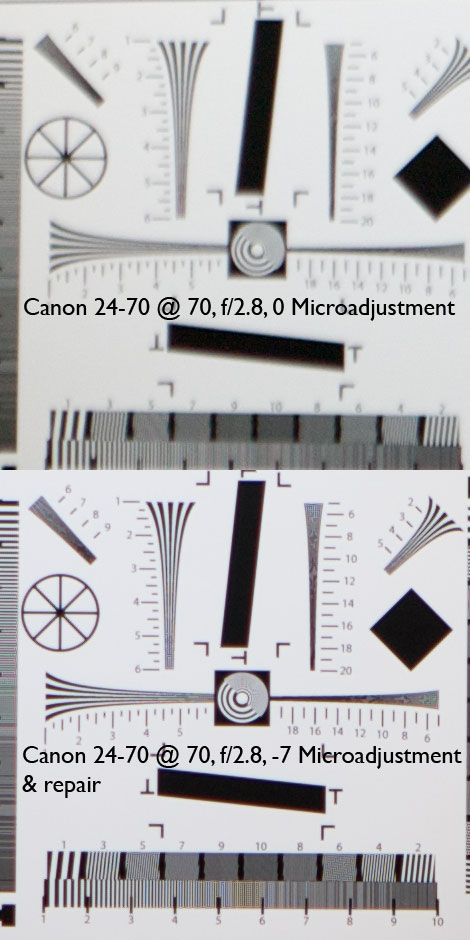
With the combination of the repair and the microadjustment calibration, my 24-70 of all my lenses shows the most improvement. It was never a stellar lens and the shift up to the higher resolution 1Ds Mark III made it seem unusable but as you can see below, the change after a repair and microadjustment calibration is significant.
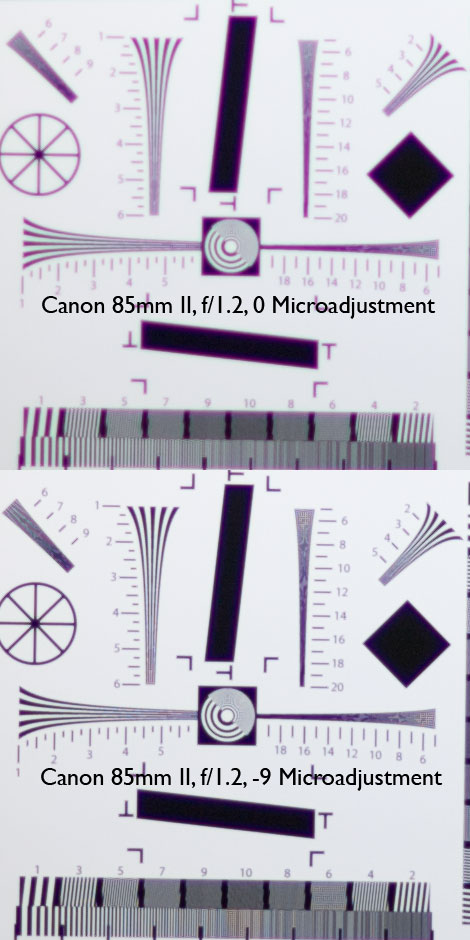
I’ve also found that when shooting wide open or close to it with a lens like the 85mm II f/1.2, I’m more likely to hit focus exactly where I placed the AF focus brackets.


The samples above are crops at 100% (72 dpi). If printed at 300 dpi each would be ~1.5″ square.
hi
for 24 – 70 ,
what dist and at what mm did u do the tests ?
I tested the lens at 70mm and with it focused at 11.5 feet (70mm x 50 = 3500mm = 350cm = 11.5 feet.
This is following the method Chuck W. recommends. He also did say that if there is a particular focal length you use often, you could try testing at that setting.